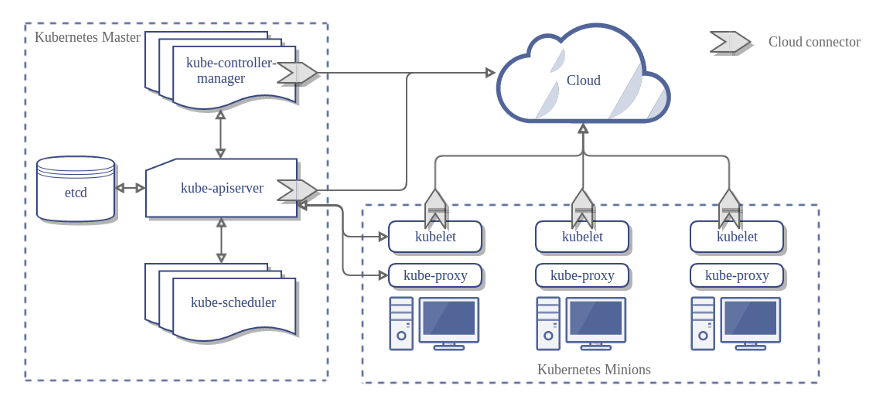
Following up the previous blog, and taking k3s as our container orchestration, it is desirable to automate as much as possible. Hence an easy way to connect and configure many hosts at once is by using Ansible. Ansible is an automation tool created by RedHat that connects to remote hosts through ssh. Good news are that thanks to itwars and the community ansible playbooks can be used to set up k3s on our nodes.
It is recommended to add tls-san so k3s server certificate will accept additional hostnames or IP as a Subject Alternative Name in the TLS cert. So simply as installing ansible using pip, setting our devices to use static IP in our LAN, copying our public ssh-key into the nodes, elect a master node and the worker nodes in hosts.ini file and run
ansible-playbook site.yml -i inventory/my-cluster/hosts.iniOnce installed, we need to copy from the master node the kubeconfig file located at ~/.kube/config by running
scp pi@master:~/.kube/config ~/.kube/k3s-ansible.yamland substitute localhost from kubernetes api server to master node ip eg.
sed -i 's/localhost/master/s' ~/.kube/k3s-ansible.yamlFinally to interact with our cluster API we must install kubectl and set KUBECONFIG, by default KUBECONFIG reads from ~/.kube/config.yaml, but in this case we are naming the file k3s-ansible.yaml, so either we set an environment variable KUBECONFIG=~/.kube/k3s-ansible.yaml or we can also install kubectx to change between cluster contexts
High availability (HA) in Kubernetes happens in two places, first need an HA datastore, with the embedded etcd as data store, it requires a quorum between odd number of nodes greater than 1, and the number of nodes that need to be online is one more than half, eg. 2 nodes out of 3 (>1.5), or 3 out of 5 (>2.5). HA also happens in the control plane, where quorum isn't needed, so 2 nodes should suffice for HA. But a cloud load balancer IP should be used as our Kubernetes API Server rather than a single master node by default. In this case bare metal kubernetes could be bootstraped with Kube-vip, so that after spinning up the first master node and pointing kube-vip IP (VIP) as the api server in kubeconfig manifests, the remaining nodes will join to the new API server. Though I won't cover this Adrian Goins cover the setup in a nice video
MetalLB is also a popular tool for on-premises Kubernetes networking, however its primary use-case is for advertising service LoadBalancers instead of advertising a stable IP for the control-plane. kube-vip handles both use-cases Setting metallb on layer 2 it announces ARP for IPv4 and NDP for IPV6, and when is set for Broader Gateway Protocol, each node establishes an encrypted peering session with your network routers and advertises IP of external cluster services.
So mind that setting multiple nodes as master, would not suffice for high availability when exposing our services. For small local environments I'd recommend to stick with layer 2 metallb and single master node.
Next, before deploying our services we need to install cert-manager to issue certificates from Let's encrypt, by running:
helm install cert-manager jetstack/cert-manager --namespace cert-manager --create-namespace --set installCRDs=trueIn addition, traefik should be patched so that it allows external traffic, plus add external name
kubectl patch -n kube-system svc/traefik -p '{"spec":{"externalTrafficPolicy":"Local","loadBalancerSourceRanges":["0.0.0.0/0"]}}'Then we can spin up an nginx to test its external IP from our LAN
kubectl deploy nginx --image=nginx:alpine --port 80 --replicas=1
kubectl expose deploy nginx --type=LoadBalancer --port 80 --target-port=80
kubectl get svc | grep nginx
If we get an external IP, the only thing left is to set the cluster issuer, in the case of cloudflare dns01 challenge resolution should be set as follows:
cat >> EOF | kubectl apply -f -
apiVersion: v1
kind: Secret
metadata:
  name: cloudflare-api-token-secret
type: Opaque
data:
  api-token: insert-token-here
EOF
cat >> EOF | kubectl apply -f -
apiVersion: cert-manager.io/v1
kind: ClusterIssuer
metadata:
name: letsencrypt-stg
spec:
acme:
email: [email protected]
server: https://acme-staging-v02.api.letsencrypt.org/directory
privateKeySecretRef:
# Secret resource that will be used to store the account's private key.
name: le-issuer-acct-key
solvers:
- dns01:
cloudflare:
email: [email protected]
apiTokenSecretRef:
name: cloudflare-api-token-secret
key: api-token
selector:
dnsZones:
- 'your.domain'
- '*.your.domain'
EOFNow, making our DNS provider pointing to our Public IP we verify the clusterissuer status
kubectl describe cert clusterissuer letsencrypt-stg


    Reason:                ACMEAccountRegistered
    Status:                True
Then we create an Ingress for our nginx service to expose it to the internet
cat >> EOF | kubectl apply -f
apiVersion: networking.k8s.io/v1
kind: Ingress
metadata:
  name: nginx-ingress
  annotations:
    kubernetes.io/ingress.class: traefik
    cert-manager.io/cluster-issuer: letsencrypt-stg
    traefik.frontend.passHostHeader: "true"
spec:
  tls:
    - secretName: ingress-tls
      hosts:
        - nginx.your.domain
  rules:
    - host: nginx.your.domain
      http:
        paths:
          - path: /
            pathType: Prefix
            backend:
              service:
                name: nginx
                port:
                  number: 80
We should be issuing a certificate from our previous command output
kubectl get certificaterequests.cert-manager.io
kubectl get certificates.cert-manager.io
And voila, If the status is approved it's all done.
We can now visit 'nginx.your.domain' using HTTPS
Tags
